Introduction
MockAPI (https://mockapi.io/) is a simple tool that lets you easily mockup APIs, generate custom data, and perform operations on it using RESTful interface. We can consume these API endpoints in our Angular 14 application to test the flow without actual Web APIs.
Create an account in MockAPI.io
It is amazingly easy to create a new account in MockAPI.
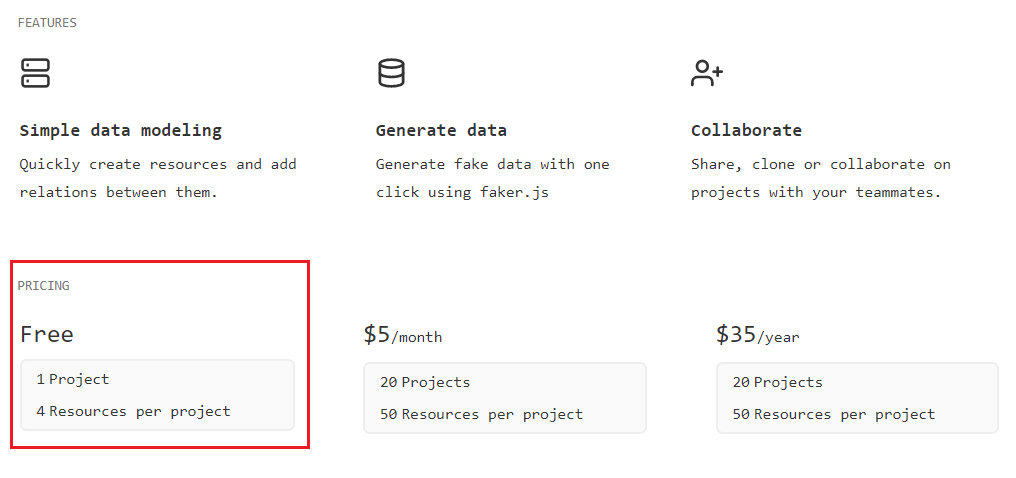
MockAPI gives various flexible plans. In the free plan, we can create one Project and four resources in that project. In the $5/month plan, we can create 20 projects and 50 resources per project. If you are ready to buy a yearly plan, you will get 20 projects plan at $35.
For testing purposes, we can choose a Free plan.
We can create a new Project in this free plan.

We can give a valid project name. It is mandatory. Also, we can give an optional API prefix as well.
Please note that we can create up to four resources in a project in Free plan.
After creating the project, we can click on the project name, and it will allow us to create resources. We can click on the New Resource button as well.
It will open a new popup window and we can give resource details here.
We are going to create an employee management application and will see all the CRUD operations using MockAPI. Hence, we can create the resource with a specific employee model.
Please note that each resource must start with an id property. You can add multiple properties as per your requirements.
Currently MockAPI supports seven types of properties.
![]()
We can create the employee resource with the following properties.
![]()
Each resource will support the below CRUD methods.
![]()
You can see a unique API endpoint for each project.
![]()
If you click the Generate All button, it will create 50 employee sample records automatically. We can also add more employee records by clicking the employee resource button. Please note that Free plan will support a maximum of 100 records per resource.
You can use the Reset All button to clear all mock data.
We can use the Data button to view all data for a particular resource. We can use the Edit button to add or remove properties from a resource. The Delete button will remove entire resources from the project.
We can create an Angular 14 project and consume these API endpoints easily. We will see all the CRUD actions using our Angular 14 project.
Create Angular 14 project using Angular CLI
We can use the CLI command below to create a new Angular project.
ng new Angular14MockAPI
![]()
Choose the routing option as Yes and stylesheet format as CSS.
Add bootstrap and font-awesome libraries to the project.
npm install bootstrap font-awesome
We must change “styles.css” file in the root folder with below changes to access these packages globally in the application without further references.
styles.css
Create an environment variable inside environment class for baseUrl. This will be used across the application.
environment.ts
Copy the API endpoint value from MockAPI and give it as baseUrl in environment file.
Create an employee interface now.
ng g class employee\employee
Use the below code.
employee.ts
Create an employee service now.
ng g service employee\employee
Use the below code.
employee.service.ts
We can create a Loader service for entire application. This service can be used for showing a loader while the application is accessing the backend MockAPI.
ng g service loader
Copy the below code.
loader.service.ts
Add the modules below to the AppModule class.
- ReactiveFormsModule
- FormsModule
- HttpClientModule
We can create an employee list component. This component will be used to display all the employee information. This component is also used to edit and remove employee data.
ng g component employee\EmployeeList
Change the class file with the code below.
employee-list.component.ts
We can change the template and style files also.
employee-list.component.html
Change the stylesheet as well.
employee-list.component.css
We can create employee edit component with the below command
ng g component employee\EmployeeEdit
Modify the class file with the code below.
employee-edit.component.ts
import { Component, OnInit, OnDestroy, ElementRef, ViewChildren } from '@angular/core';
import { FormControlName, FormGroup, FormBuilder, Validators } from '@angular/forms';
import { Subscription } from 'rxjs';
import { ActivatedRoute, Router } from '@angular/router';
import { Employee } from '../employee';
import { EmployeeService } from '../employee.service';
import { LoaderService } from 'src/app/loader.service';

@Component({
  selector: 'app-employee-edit',
  templateUrl: './employee-edit.component.html',
  styleUrls: ['./employee-edit.component.css']
})
export class EmployeeEditComponent implements OnInit, OnDestroy {
  @ViewChildren(FormControlName, { read: ElementRef }) formInputElements!: ElementRef[];
  pageTitle = 'Employee Edit';
  errorMessage!: string;
  employeeForm!: FormGroup;
  tranMode!: string;
  employee!: Employee;
  private sub!: Subscription;

  displayMessage: { [key: string]: string } = {};
  private validationMessages: { [key: string]: { [key: string]: string } };

  constructor(private fb: FormBuilder,
    private route: ActivatedRoute,
    private router: Router,
    private employeeService: EmployeeService,
    private loader: LoaderService) {

    this.validationMessages = {
      name: {
        required: 'Employee name is required.',
        minlength: 'Employee name must be at least three characters.',
        maxlength: 'Employee name cannot exceed 50 characters.'
      },
      cityname: {
        required: 'Employee city name is required.',
      }
    };
  }

  ngOnInit() {
    this.tranMode = "new";
    this.employeeForm = this.fb.group({
      name: ['', [Validators.required,
      Validators.minLength(3),
      Validators.maxLength(50)
      ]],
      address: '',
      cityname: ['', [Validators.required]],
      company: '',
      designation: '',
    });

    this.sub = this.route.paramMap.subscribe(
      params => {
        const id = params.get('id');
        const cityname = params.get('cityname');
        if (id == '0') {
          const employee: Employee = { id: "0", name: "", address: "", company: "", designation: "", cityname: "" };
          this.displayEmployee(employee);
        }
        else {
          this.getEmployee(id);
        }
      }
    );
  }

  ngOnDestroy(): void {
    this.sub.unsubscribe();
  }

  getEmployee(id: string | null): void {
    this.loader.show();
    this.employeeService.getEmployee(id)
      .subscribe({
        next: (employee: Employee) => this.displayEmployee(employee),
        error: (err) => {
          this.errorMessage = <any>err;
          this.loader.hide();
        },
        complete: () => {
          console.info('Get employee in employee edit');
          this.loader.hide();
        }
      });
  }

  displayEmployee(employee: Employee): void {
    if (this.employeeForm) {
      this.employeeForm.reset();
    }
    this.employee = employee;
    if (this.employee.id == '0') {
      this.pageTitle = 'Add Employee';
    } else {
      this.pageTitle = `Edit Employee: ${this.employee.name}`;
    }
    this.employeeForm.patchValue({
      name: this.employee.name,
      address: this.employee.address,
      company: this.employee.company,
      designation: this.employee.designation,
      cityname: this.employee.cityname
    });
  }

  deleteEmployee(): void {
    if (this.employee.id == '0') {
      this.onSaveComplete();
    } else {
      if (confirm(`Are you sure want to delete this Employee: ${this.employee.name}?`)) {
        this.loader.show();
        this.employeeService.deleteEmployee(this.employee.id)
          .subscribe({
            next: () => this.onSaveComplete(),
            error: (err) => {
              this.errorMessage = <any>err;
              this.loader.hide();
            },
            complete: () => {
              console.info('Delete employee in employee edit');
              this.loader.hide();
            }
          });
      }
    }
  }

  saveEmployee(): void {
    if (this.employeeForm.valid) {
      if (this.employeeForm.dirty) {
        const e = { ...this.employee, ...this.employeeForm.value };
        if (e.id === '0') {
          this.loader.show();
          this.employeeService.createEmployee(e)
            .subscribe({
              next: () => this.onSaveComplete(),
              error: (err) => {
                this.errorMessage = <any>err;
                this.loader.hide();
              },
              complete: () => {
                console.info('Create employee in employee edit');
                this.loader.hide();
              }
            });
        } else {
          this.loader.show();
          this.employeeService.updateEmployee(e)
            .subscribe({
              next: () => this.onSaveComplete(),
              error: (err) => {
                this.errorMessage = <any>err;
                this.loader.hide();
              },
              complete: () => {
                console.info('Update employee in employee edit');
                this.loader.hide();
              }
            });
        }
      } else {
        this.onSaveComplete();
      }
    } else {
      this.errorMessage = 'Please correct the validation errors.';
    }
  }

  onSaveComplete(): void {
    this.employeeForm.reset();
    this.router.navigate(['/employees']);
  }
}
We can change the template file also.
employee-edit.component.html
We need one more component to display the employee details in a separate window. We can create now.
ng g component employee\EmployeeDetail
We can change the class file with the code below.
employee-detail.component.ts
Modify the template file with the code below.
employee-detail.component.html
Create the navigation menu component now.
ng g component NavMenu
Modify the class file with the code below.
nav-menu.component.ts
Change the template file with the code below.
nav-menu.component.html
We can also change the stylesheet file with the code below.
nav-menu.component.css
Create the final component Home now.
ng g component home
There is no code change for the class file. We can change the html template file with the code below.
home.component.html
We must add below route values in the app-routing.module class as well.
app-routing.module.ts
Change the AppComponent with the code below.
app.component.ts
We can change the app.component.html with the code below.
app.component.html
Change the stylesheet with the code below.
app.component.css
We have completed the entire coding part. We can run the application now.
![]()
Click the Employees menu and add a new employee record.
![]()
Added employees will be listed as a grid format on the screen.
![]()
We have search, edit, and remove features also available in the application.
Conclusion
In this post, we have seen how to create a mock API using MockAPI.io. MockAPI provides a free plan to create one project and four resources. We have created an employee resource and consumed this resource from an Angular 14 application. We have seen all CRUD operations using MockAPI and Angular 14 application. MockAPI also provides various paid plans as well. You can try from your end and feel free to write your valuable feedback.